How to Execute the 4 Most Common Types of Plastic Welds

When welding plastics, there are several considerations that can play a pivotal role in the success of your weld. These can include the hot air tool, power, nozzle, type of plastic, pressure, and cooling, among others. Most importantly, it includes the welding technique for your application. With several different methods, you need to select the one that makes most sense for what you want to achieve. We dive into those below.
The Most Common Types of Plastic Welds
Plastic welding is a technique used to join or repair plastic parts by melting and fusing them together. There are several common types of plastic welds, each used for different types of plastics and applications.1. Hot Air Welding
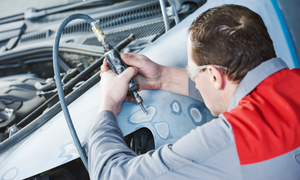
Hot air welding, also known as hot gas welding, is a widely used method for joining thermoplastics. It involves heating the plastic surfaces with a specialized heat gun or hot air welder until they reach their melting point. The melted surfaces are then pressed together, which creates a strong bond as they cool. This technique requires skill and precision to ensure proper heating, alignment, and pressure during the welding process.
Four Main Welding Parameters
The main welding parameters are temperature, pressure, welding speed, and hot air tool position. To ensure a successful weld is created, it is crucial that the technician has a good understanding of these parameters so they can be applied correctly during the welding operation.
1. Protective Films & Coatings
Before executing your weld, you will need to determine the proper welding technique and tool, both of which can depend on the type of plastic material used. Make sure your plastic parts are clean and that the surrounding environment is free of dust and debris, as any contamination could weaken your weld. Some key tips include:
- When selecting the materials for welding, check that the rod and/or substrate materials are the same type of plastic polymer (HDPE, LDPE, PP, PVC, etc.).
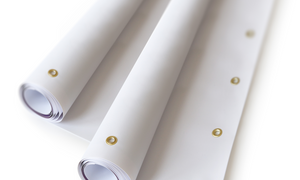
- Some plastics are manufactured with a protective film or coating. Make sure to check manufacturer specifications to be sure that any protective film is removed from the surface before welding.
- Once the film has been removed, then a beveler scraper can be used to eliminate the surface layer of the material in the vicinity of the weld.
- If the prepared substrate is not welded the same day, then you’ll need to repeat the substrate preparation phase again. It is very likely an oxidized coating will form on unprotected plastic welding rod and plastic substrates, which can cause surface contamination and result in an inadequate or defective welded seam.
2. Types of Hot Air Welding
The most common types of hot air welding are speed welding, extrusion welding, and overlap welding.
The speed welding technique uses a lightweight handheld hot air tool with specially designed speed welding tips/nozzles. The welding rod, also known as the filler rod, will fill the seam with melted plastic during the welding process. After the hot air tool has reached the desired temperature, the welding rod is inserted into the specially designed speed welding nozzle. While inserting the welding rod, apply slight downward pressure to feed it through the speed welding nozzle. The welding rod is then softened-melted by the hot air flow generated by the tool. A molecular bond is then formed when the welding rod and two substrates begin to cool.
The extrusion welding technique uses a hot air tool designed with specially designed welding shoes. Like hot air speed welding, hot air is generated by an extrusion unit. Hot air is also generated through an external airflow nozzle, which softens-melts the welding rod and the two plastic parts that are being welded together. However, unlike hot air speed welding, the handheld extruder pulls the welding rod, or filler rod, into a heated chamber by use of a screw or worm gear, which in turn pushes the softened-melted welding rod through a welding shoe.
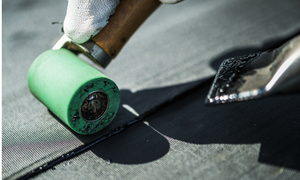
The overlap welding technique uses a lightweight handheld hot air tool with specially designed flat wide slot nozzles. This combination acts together to soften-melt two separate layers of coated thermoplastic membranes (sheets). The nozzle is placed between the two membranes, heating the membranes simultaneously.
Holding the hot air tool in one hand and a specially designed roller in the other, the technician will heat both layers of membrane, while moving the hot air tool along the outer edges of the membranes. Both heated membranes are then pressed together with the roller to form a welded seam.
When performing a hot air weld, you’ll often use a hot air hand tool or extruder such as the IHS Type 1600 or HSK 10DI 120V Digital Mini, as well as a nozzle and welding rod or filler rod.
>>Related read: 10 Tips for Successfully Welding Plastics
2. Ultrasonic Welding
Ultrasonic welding is an economical and easily automated welding technique in which high-frequency energy generates heat and welds plastic parts together. This method is often used for joining small or delicate plastic components, such as electrical parts, or toys. It is also widely used in the manufacture of appliance, automotive, and medical device components, as well as a variety of enclosed assemblies and subassemblies. The welded parts are held together under pressure while ultrasonic vibrations are applied to the joint area. The friction generated by the vibrations creates heat, which melts and fuses the plastic together. Ultrasonic welding offers rapid and precise joining and requires specialized equipment, including an ultrasonic welding machine equipped with a horn or sonotrode, as well as fixtures and clamps to hold the plastic parts while welding them together.
There are advantages to using the ultrasonic welding technique. These include low energy usage, repeatability, and reliability. However, there are some potential hurdles that should be considered when determining if this welding method is ideally suited for your application. These include recognizing budget and process limitations such as machinery, tooling, fixture selection, and cost.
Although ultrasonic welding offers many advantages, it is an extremely delicate process that can result in inconsistent process results. Fortunately, most process-related issues are simple to troubleshoot and correct. For starters, it is key to understand the causes of inconsistent weld performance and how to produce a finished assembly that meets your specifications for strength requirements, sealing requirements, and dimensional tolerances. Inconsistent welds fail to meet one or more of these criteria. The following process problems can be easily corrected.
- The energy being applied to parts may be inadequate, resulting in an inconsistent weld.
- The amount of time that energy is applied is incorrect. The correct amount of energy must be applied to the parts for a specific amount of time to achieve satisfactory welding results. If the amount of time the energy is applied to the parts is too short, an “underweld” condition will result. If the amount of time the energy is applied to the part is too long, then an “overweld” condition will result. Both conditions can be corrected by incrementally increasing or decreasing the amount of energy and time it is applied to the parts.
- Too much energy can be absorbed into the surrounding parts fixture, resulting in inconsistent welds. Using fixture materials with a lower absorption rate will help ensure that the correct amount of energy is being applied to the parts being welded. Consult the machine manufacturer specifications for fixture materials with a lower absorption rate (aluminum, steel, etc.).
- Excessive moisture can contaminate the welded seam. Ensure the parts being welded are dry and free of moisture.
- Parts that are incorrectly positioned in the fixture can result in inconsistent welding performance.
- Equipment operated at a lower frequency can in some cases cause damage to sensitive electrical components due to vibration. Since more vibration is present at lower frequencies, it may be necessary to use a higher frequency to reduce the amount of vibration.
Consistent welds can be achieved by implementing step-by-step problem-solving exercises. Using the machine and part manufacturer recommendations for the adjustment of frequency amplitude, speed of the horn or sonotrode, gauge pressure, trigger force, part position, etc., is essential to achieve consistent and repeatable weld results. Understanding how these adjustments work together will be very helpful in troubleshooting process-related issues.
When performing an ultrasonic weld, you’ll often use an ultrasonic welding machine such as the Sonics X-Press Model XPE & XPT 1200 and 2200.
3. Spin Welding
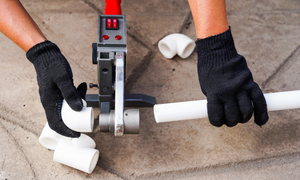
Spin welding is frequently used for circular or cylindrical plastic parts, such as pipes, fittings, or containers. In this technique, one part is held stationary while the other is rotated at a high speed. Frictional heat is generated between the two parts, and the plastic softens and forms a bond as a result. To achieve a strong and uniform weld, you need precise control of the rotational speed, time, and pressure.
Rotational Speed
Rotational speed is measured in revolutions per minute (RPMs). The rotational speed and the increase of heat that is generated through the contact of the parts being welded are directly proportional. Therefore, the faster the speed, the more heat is generated on the part surfaces being welded.
Time
Welding time is defined as how long the part is rotated while in contact with the stationary part being welded. It plays an integral role in how much heat will be generated in the welding process. Through heat generation, a “threshold time” and “steady state” are created for the welding process. Threshold time is defined as the time it takes to achieve a steady state for heat generation. A steady state is achieved when the melted material is equal to the amount of material expelled by the welding pressure. The result is a uniform melt layer.
Pressure
Pressure is measured in pounds per square inch (PSI). As the pressure that is applied to the part surfaces being welded increases, the amount of friction between the part surfaces also increases. The rotational speed, time, and pressure are all factors in determining how much heat will be generated on the part surfaces to be welded. By fine tuning these parameters, you can achieve a repeatable and reliable welding process. The required tools for the spin welding technique include a spin welding machine equipped with chucks or tooling, which are designed to hold your parts and maintain alignment during rotation. There are two types of spin welding machines: inertia welding machines and continuous drive machines. Both are designed so that one of the parts to be welded is clamped into stationary fixture (“fixed tooling”), while the other part to be welded is clamped into rotating fitting (“driven tooling”). However, they use different methods of operation.
Types of Spin Welding Machines
Inertia Welding Machines
With an inertia welding machine, a motor spins at a set rate of RPMs. When the motor is disengaged, the machine slows as a result of surface friction from the parts being welded. A fly wheel, which continues to spin through inertial energy, transfers this energy to the part surfaces. There are two designs available for inertia welding machines:
- The first design disengages the rotating driven tooling part and allows the driven tooling part to continue to rotate until it slows to a stop. The pressure applied to both the fixed tooling and driven tooling parts, along with solidification (cooling) of the part surfaces, forms a molecular bond. This results in the welding of both surfaces.
- The second design allows the driven tooling part to rotate until both the driven tooling and fixed tooling parts surfaces begin to cool. The pressure combined with the solidification (cooling) of thermoplastic material then stops the driven tooling part from rotating. A molecular bond is then formed, and the weld is complete.
Continuous Drive Welding Machines
Continuous drive welding machines operate under the same principle as inertia welding machines. However, instead of disengaging the drive when welding begins, the driven tooling part continues to spin through the entire welding cycle. The rotation of the driven tooling part is stopped using a mechanical braking system that can gradually or instantly halt the rotation depending on the desired process requirements.
4. Solvent Welding
Solvent welding is a bonding method that uses a chemical solvent to soften and fuse plastic parts together. The solvent is applied to the joint area, causing the plastic to dissolve and form a bond as it evaporates. Solvent welding requires compatible plastics and careful application of the solvent. While solvent welding is a relatively simple and inexpensive technique, making consistently good solvent-welded joints requires a clear understanding of several key concepts and process steps.
Compatibility
The first and most important consideration in choosing a solvent is whether or not it is compatible with the polymers being joined together. When using noncompatible polymers and solvents, the polymer chain movement within the dissolved polymers will be compromised, creating a weak weld. Although using the same polymers is the most common method for bonding, there are certain methods that are used for bonding dissimilar polymers. For example, ABS and acrylic can be successfully bonded using a methyl ethyl ketone (MEK) solvent. To achieve the best bonding results for your plastic materials, research the manufacturer bonding specifications and recommendations for your application.
Common Solvents
The most common solvents used in solvent bonding in both pure and combined forms include:
- Methyl ethyl ketone (MEK)
- Cyclohexanone (CH2)5CO
- Methylene chloride (CH2Cl2)
- Tetrahydrofuran (THF)
- Ethyl acetate (EtOAc)
Solvent Solutions
Solvents can be applied as 100 percent solvent or by diluting the solvent with an additive. For example, technicians can change the evaporation rate or viscosity of the solvent solution by creating a solvent slurry using the pure solvent and up to 25 percent of the plastic being welded. This will make the solvent easier to use, especially, when filling areas or openings between the parts being welded. The technician can also combine the primary solvent with compatible solvents, which will produce an optimized formula for a specific combination of materials and/or parts.
Surface Preparation
After the molding process, the surfaces to be bonded typically have some residual contamination. Reducing contamination increases the surface activation of the material and makes it easier to bond. Cleaning the surfaces with isopropyl alcohol is a simple way to solve for this. A more advanced technique involves increasing surface energy through plasma treatment. This method bombards the part surfaces with gas ions and corona treatment, which can improve adhesive strength by exposing the parts to an electrical discharge.
Solvent Application
When applying the solvent, cover the entire joint and immediately remove excess solvent. Leaving excess solvent can affect the integrity of the bond and/or cause joint discoloration. After applying the solvent, the parts should be assembled while the surfaces are still fluid and wet.
Curing and Ventilation
It is important to allow solvents to completely evaporate from the materials. To avoid stress cracks, remember that complete evaporation of the solvent can take at least 24 hours.
Proper aeration and venting throughout the curing period (annealing process) must be provided to allow solvents to completely evaporate from the materials. Completed joints should remain untouched until the bonds have cured enough to be handled.
Annealing of plastic components can also be done prior to assembly and welding. This will also help to reduce the development of stress cracking. The batch annealing process can be completed using the Forsthoff Type 7500 or the IHS Type 10000 Air Heaters. The infrared annealing process can be completed using the Tempco RPM or the Tempco RPB Infrared Panel Heaters.
These are some of the polymers (amorphous materials) that are susceptible to stress cracking:
- Polymethyl methacrylate (PMMA / Acrylic)
- Polystyrene (PS) • Polycarbonate (PC)
- Polyvinyl chloride (PVC)
- Acrylonitrile butadiene styrene (ABS)
- Polyetherimide (PEI)
The risks associated with stress cracking can be minimized by careful selection and formulation of the solvent. Using appropriate surface preparation in the fabrication process will also help to minimize the possibility of stress cracking. Again, it is important to research the manufacturer bonding specifications and recommendations for your plastic material.
Process Tips
- Clean the surfaces with isopropyl alcohol to reduce residual contamination.
- Solvent can become trapped in the welded joint and compromise the integrity of the welded joint. Avoid applying an excessive amount of solvent can eliminate this problem.
- Adhere to extended drying time requirements for curing.
- Provide adequate ventilation during the welding (bonding) and curing process to allow the safe evaporation of the solvent vapors.
>>Related read: The 5 Most Common Types of Plastic Welding Joints
Hot air, ultrasonic, spin, and solvent welding are often used to fabricate thermoplastic parts, fixtures, and assemblies for a variety of industries. These include aerospace, civil engineering, construction, industrial, marine, medical, military, and public and private transportation.
Whether you choose to use one of these techniques, or any others, such as laser welding or induction welding, always be sure to keep the type of plastic and end product in mind.
How to Perform an Expert Plastic Weld
Performing plastic welds expertly requires practice, attention to detail, and expert knowledge of the specific plastic materials being used. The tips below can help you achieve high-quality plastic welds, no matter the technique being used.
Choose the Correct Hot Air Tool
Use the correct welding equipment and tools designed for the specific plastic welding technique. Different types of plastics may require different equipment, such as heat guns, ultrasonic welders, spin welding machines, or solvent applicators. For example, if you’re performing a hot air weld, you might consider using the Steinel HG 2620E Hot Air Tool. Alternatively, if you’re performing an ultrasonic weld, you may consider using a Sonics X-Press Model XPE or XPT Ultrasonic Welder.
Prepare a Clean Surface
Keeping your welded surfaces clean and free from contaminants will help create a strong, lasting weld. Prior to welding, you may need to sand your plastic, clean it with a solvent, or scrape off surface oxidation with a tool like the IHS Stick Beveler Scraper.
Perform a Test Weld
Before welding your plastics, always experiment with scrap materials or demo pieces. This will help create a solid weld on your first attempt, saving you both time and money. This test weld will also help you determine if you’re using the correct plastic. Across these processes, you need to weld the same types of plastics together. Otherwise, you'll create a weak weld.
Maintain Your Temperature
When using heat-based welding methods like hot air welding, maintain precise control over the temperature. Overheating can degrade the plastic or cause weak welds, while insufficient heat may result in poor fusion.
Apply Appropriate Pressure and Alignment
Apply the appropriate pressure and ensure proper alignment between the parts being welded. This helps create a strong bond and ensures the weld has uniform strength.
Find Your Hot Air Tool Here
When it comes to hot air welding, the tool and accessories you choose can have a direct impact on your success. And with thousands of options to choose from, where do you start? Our team of experts can help you identify the right plastic welding tool for your application. Reach out to us and we can set you up for success.

- Robert Heater