A Roofer's Guide to Plastic Welding: Getting Started and Tools You Need

Plastic welding has become increasingly popular across multiple industries, including roofing. This technique is used to join thermoplastics by applying heat, making it ideal for tasks like sealing and repairing thermoplastic membranes, such as thermoplastic polyolefin (TPO) and polyvinyl chloride (PVC). If you're a roofer who wants to expand your skills and incorporate plastic welding into your services, this guide will help you get started, outlining the essential tools and techniques to master the process.
>>Related read: 11 Single-Ply Roofing Tools Contractors Need
Why Plastic Welding in Roofing?
Plastic welding offers several advantages when it comes to repairing thermoplastic roof systems. The roofing industry has increasingly embraced thermoplastics due to their lightweight, durability, and resistance to UV rays and chemicals. Instead of traditional adhesive-based repairs, plastic welding delivers a seamless, airtight seal that is less prone to wear and tear.
Additionally, plastic welding offers:
- Strong bonds: The welding process fuses the materials on a molecular level, making the seams as strong (or stronger) than the surrounding material.
- Longevity: Welded seams last longer than adhesives, ensuring a more durable roofing system.
- Efficiency: Welding can often be quicker than using adhesive-based methods, especially when it comes to larger areas.
Essential Tools for Plastic Welding in Roofing
To reap these benefits, it’s also key to use the correct tools for your specific applications. The following can help you achieve your desired results:
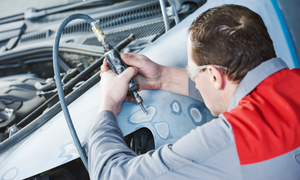
- Hot air hand tool: Suitable for smaller repairs and detailing work, hot air hand tools like the IHS Type 1600 and Steinel MH7 with rechargeable battery are versatile and portable, making them an excellent option for roofers working on patch repairs.
- Automatic roof welding machine: Automatic roof welding machines like the Forsthoff P2 40 mm & 45 mm Automatic Roof Welding Machine or the HSK Plast 3400-RW, 230V 40 mm Overlap Welding Machine are commonly used for plastic welding on large roofing projects. They help automate the welding process, making it faster and more consistent, especially for long, continuous seams on larger, flat roofs.
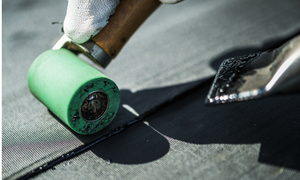
- Seam roller: A seam roller like the IHS 2-in. Wide Silicone Seam Roller is used to press down on the thermoplastic membrane while the material is still hot and soft. This helps create a smooth, uniform seam and eliminates any wrinkles, air bubbles (pockets/channels), or uneven areas that could compromise the integrity of the weld.
- Seam probe: A seam probe like the Everhard Convertible Seam Tester is used to check the integrity of the weld to help ensure a water-tight welded seam. It is essential in locating small gaps or partial welds in overlap welded seams.
- Nozzles: The nozzle you use depends on the specific weld you’re working on. A wide width nozzle is ideal for long, flat seams, while a narrow width nozzle is more suited to detailed work or hard-to-reach areas. Make sure to have a variety of nozzle sizes in your toolkit to handle different roofing tasks.
- Temperature controller: Controlling the temperature is crucial in plastic welding. Too much heat can melt the membrane, while too little will fail to fuse the materials properly. A temperature thermometer helps ensure that you are working within the recommended heat range for your specific roofing membrane, typically between 500°F to 1100°F, depending on the material.
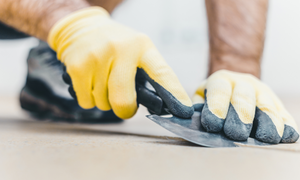
- Heat-resistant gloves and safety gear: As with any process involving high temperatures, safety is a priority. Heat-resistant gloves will protect your hands while you work and wearing appropriate eye protection will guard against accidental burns or flying debris. Additionally, if working indoors or in enclosed spaces, ensure proper ventilation to avoid inhaling fumes.
>>Related read: 5 Steps to Repair Single-Ply Roofing Punctures With Hot Air Tools
Steps to Create the Ideal Plastic Weld on a Roof
- Prepare the surface: Before you start welding, clean the surface of the roofing membrane to remove any dirt and debris. The surface should be dry and free of any contaminants that might interfere with the welding process.
- Set the temperature: Based on the type of thermoplastic membrane you're working with, set the temperature of your hot air tool to the correct temperature setting. Make sure to reference the manufacturer’s guidelines, as using the wrong temperature can result in weak welds or damage to the material.
- Make test weld: Once the hot air tool has been calibrated to the correct temperature setting, then perform a test weld to assure that a quality weld has been achieved. The Film Test Bond, or FTB testing, method can be used to determine if the weld is acceptable.
- Preheat the material: Begin by gently preheating the thermoplastic membranes you want to join. This helps to soften them and make them easier to work with. Move the hot air tool evenly across the seam area.
- Press and seal: As the plastic reaches its melting point, use your silicone roller to press the two membranes together firmly. Ensure the weld is smooth and uniform, pressing out any air bubbles.
- Inspect the weld: Once the weld cools down, inspect it for any gaps, bubbles, or weak areas. A strong, durable weld should be smooth, with no visible defects. Use a seam probe to be sure there is a uniform bond along the welded overlap seam. If necessary, reheat and rework any sections that appear to have partial or inadequate welds.
Whether you’re working on small repairs or large commercial roofs, mastering these plastic welding steps can help improve your efficiency, performance, and profitability.
Expand Your Plastic Welding Expertise with IHS
If you want to get started with plastic roofing, IHS can help set you up for success. Not only can you find hundreds of roofing tools, but you can also take advantage of a variety of service offerings, including:
- Live video chat: Connect with us from the job site. We hold live video chats with customers to remotely view what they see, quickly troubleshoot issues and then recommend quick fixes or next steps.
- Arranged pickup and delivery: We will arrange for your hot-air tool to be picked up and dropped off after it’s been serviced, saving you money in costly shipping fees.
- Preventative maintenance: With each repair, we also perform any necessary preventative maintenance to prolong the life of your tool and help avoid future breakdowns.
- Rentals: Rent a replacement tool while IHS repairs your broken one and avoid costly downtime.
Click the button below to get started working with us.

- Tags: Plastic welding Roofing
- Robert Heater