5 Steps to Repair Single-Ply Roofing Punctures With Hot Air Tools


Single-ply membranes, such as PVC and TPO, are ideally suited for commercial roofing systems because they are durable and easy to work with, come in different thicknesses, are watertight, and can contain additives for flexibility, UV protection, and color. However, as with all roofing systems, they require regular inspection and upkeep.
It is not uncommon for storms, debris, or man-made objects to puncture or tear a single-ply sheet. If not immediately addressed, this can lead to water damage and other issues. Fortunately, with the right tools and techniques, this damage can be quickly remedied by hot-air welding a patch over the hole or rip.
Below are step-by-step instructions on how to hot-air weld a patch onto a single-ply roofing membrane.
Step 1: Collect Your Tools
To weld a single-ply patch in place, you’ll need the proper equipment:
- Hot-air hand tool—This handheld heat source can be easily moved around to access all sides of the patch. An example of one of these tools is the IHS Type 1600 Hot Air Tool, which features a fast temperature ramp-up rate and an electronic temperature control that allows for a stable temperature output.
- Overlap nozzle—An overlap nozzle is a flat-tipped nozzle that lets you easily apply hot air directly at the point where the roofing material and patch come into contact. IHS's 40 mm Wide Slot Nozzle allows for seamless application and is also compatible with other manufacturer’s hot air tools.
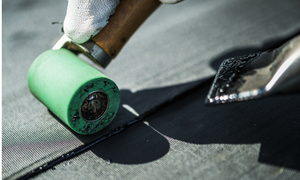
- Silicone seam roller—This will help you apply the necessary pressure to the heated patch and roofing material to ensure that a strong bond is formed. A tool that can be used for this process is the IHS 2-inch Silicone Seam Roller, manufactured with a high-quality stainless steel “ball bearing” style.
- Seam probe—A seam probe is a tool that detects defective seams. The IHS Knife and Seam Probe Kit is a combination pocket utility knife and seam probe kit that work together to efficiently identify any issues.
- Automatic welder—Automatic welders allow users to set welding parameters and then can operate on their own. An example is the Forsthoff P2 40 mm & 45 mm Automatic Roof Welding Machine, which features easy-to-use digital temperature selection, air flow adjustments and well-balanced welding pressure.
Step 2: Create a Patch
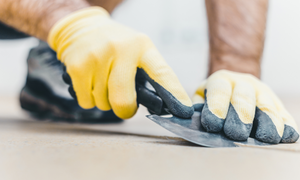
Using the same material as the roofing membrane, take a knife and cut a patch to place over the puncture or tear that stretches out 3-4 inches past the hole in all directions.
Step 3: Clean the Patch and Surface Material
Next, make sure both the patch and surface material are free of any debris, dust, oil, or other contaminants. These contaminants can negatively affect the weld quality, and lead to a weak bond or no bond at all. To find the best cleaning product for your patch, consult your roofing material manufacturer.
Step 4: Weld the Patch in Place
To weld the patch in place, follow these simple steps:
- Secure the overlap nozzle to the hot-air tool.
- Preheat the hot-air tool to the required air temperature. This will vary based on the plastic material and environment, so always perform a test weld before starting on the final patch.
- Place the patch directly over the puncture or tear so that there are several inches of overhang on each side.
- Insert the overlap nozzle between the patch and roofing membrane. In the other hand, press the pressure roller on top of the patch where the overlap nozzle ends.
- Work your way around the patch, making sure to weld the entire surface area to the roof sheet, especially the edges. Effective plastic welding takes proper technique, which comes with time and practice.
Step 5: Test the Patch Seam for Gaps
Once complete, let the patch cool for several minutes, and then run your metal prod along the seam edge to ensure there are no gaps or voids. If there are, re-weld that area.
Even the smallest gaps or voids can allow water in, which over time will widen the problem area and eventually lead to water damage.
If you have any questions about this process or would like more information on hot-air hand tools, please contact one of our technical representatives at 844-862-7880 or email info@ihshotair.com.
Tools of the Trade
Several hot air tools are available to help you successfully repair single-ply roofing punctures. Take a deeper look at the products mentioned above.
- IHS Type 1600 Hot Air Tool: The IHS Type 1600 Hot Air Tool is a durable and reliable hot air tool that features fast temperature ramp-up rate and an improved electronic temperature control allows for a stable temperature output. It is also designed with an “Automatic Shut Off Safety Mode” feature. When the power switch is turned off, then the heat output is disabled, and the blower system will continue to run for approximately two minutes. The tool will then shut off by itself once the temperature has dropped to a safe level for handling.
- 40 mm Wide Slot Nozzle: The 40 mm Wide Slot Nozzle is designed to maximize and evenly distribute a uniform and consistent air flow output. This nozzle is also compatible with other manufacturer’s hot air tools.
- IHS 2-inch Silicone Seam Roller: The IHS 2-inch Silicone Seam Roller is a high quality stainless steel "ball bearing" style construction, with a finished hardwood handle. Ideal for pressure seam rolling, it features a silicone rubber seam roller for heat welding membrane seams and a heavy fork that won't bend or twist from pressure.
- IHS Knife & Seam Probe Kit: The IHS Knife and Seam Probe is a high quality combination pocket utility knife and seam probe kit. It includes a set of five replacement carbon steel two-point utility blades, a set of five replacement carbon steel two-point hook blades, a fine point foldout seam probe tool and a tool carrying pouch.
- Forsthoff P2 40 mm & 45 mm Automatic Roof Welding Machine: The Forsthoff Roof Automatic Roof Welding Machine is a roofing professional's ideal choice for welding single ply roofing membranes. Its well balanced machine design and powerful drive motor assembly provides for fast, efficient, and virtually flawless welded seams for 45, 60, and 80 millimeter thermoplastic membrane thicknesses.
Get more insights from Industrial Heat Sources
Want to receive more insights from IHS? Subscribe today to our bi-monthly newsletter, which features resources, specials on products, and more.
- Robert Heater